Get Off The Rack: A DIY Alternative To The Canning Rack

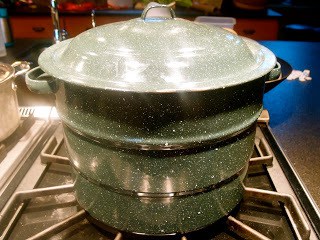
Most beginner food preservers (and I count myself as an advanced beginner) start with the standard issue water bath canner. It’s usually blue or green with funny speckles on it and can be found pretty cheaply new or really cheaply used.

My ginormous canning kettle came from the thrift store and cost, as I recall, $10. These big kettle things are great for preserving high-acid jams, fruits, and pickles, the gateway drugs of food preservation.

They usually come complete with a canning rack, and it is here that everything falls apart. If you are new to this water bath canning thing, please allow me to share my none-too-subtle opinion: these canning racks are total crap.

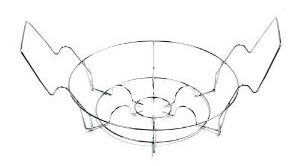
You think, because these racks often come with the canner that they are somehow supposed to make your canning process more efficient, easier or safer. Certainly using the rack seems to be the “official” way to can. Well, hogwash.

The idea seems to be that you can load or unload all your filled jars from a huge pot of boiling water with grace and ease by using the flimsy wire handles of the rack. That’s a total joke. The racks really only fit huge quart jars, and even those don’t exactly seem locked in place. And little half-pint jars? Forget about it – they fall right through. All my attempts to streamline the process of setting in or removing jars en mass have resulted in tipped or toppled jars and scalds from splashed water.

Thankfully, there is another way – a DIY way. First, it’s good to know that the legitimate reason that people use canning racks is to keep the jars off the floor of the canning pot and allow the boiling water to circulate all around. This is important – you don’t want crazy heat spots scorching your jam, breaking your glass jars, or otherwise ruining your jamming day.

With a bunch of old, no-longer-canning worthy jar rings and a few plastic zip ties, you can have a custom-sized DIY Canning Rack alternative in about 3 minutes.

This rack was so simple to make, it hardly needs instructions. Basically, you just use zip-ties to hold the old rusty rings together in a size and configuration that fits your canning kettle. There are a few tips I’ll pass on:

  • Use regular, not wide mouth rings. If you use the wide mouth, your regular jars might slip through.
  • Use your old rings that are a bit dented or have some rust spots on them. Reuse beats recycle!
  • Use the little zip-ties that aren’t much good for anything else. They are perfect for this.
  • Do not zip-tie the rings super tight. It’s good for there to be a little wiggle-room in the rings to allow the rack to better conform to the shape of the kettle bottom. Besides, if you pull the rings together snuggly, they tend to make a shallow dome shape.
  • When everything looks right, trim the zip ties so their little tails aren’t poking up.
  • Use the rack top-side up to avoid narrow jars slipping through.

So far I love my DIY Canning Rack. What’s your best punk canning tip?

Comments

  1. Zip ties! Of course! I rigged something like this years ago, except I used twist ties, which rusted immediately. I agree that the racks that come with canners are crap-ola. You are a genius! I'm going to make one of these post haste.

  2. marci357 says:

    I used the canning rings – but without tying them together – just set in place.

    However – I prefer the flat circular hole-filled bottom of the pressure canner now…

    I don't even remember why I was using the rings now – as I've never water-bathed… pressure canned, hot pack pickles and relish, dried, or froze… that's all I do.

  3. Tell it, sister – those racks are useless! My current preferred method is a dish towel in the bottom of the pan. Nestles the jars nicely, distributes the air bubbles so they don't disturb your jars and the jars don't slide around as you're loading. Takes some practice but it's fantastic once you get it down.

  4. Lily Girl says:

    Agreed those racks are totally useless. Clearly the people who put these things together are not themselves canners.
    I made one of these a while back, but used kitchen twine instead of the zip-ties since that's what I had handy at the time. I've also used a cake rack that just fit the bottome of the canning kettle with a couple of old rings tied to the bottom to give it needed support in the middle of the rack. That has been my favorite solution thus far. My only complaint with all of these racks has been that no matter how quickly I dry off the rack, it always ends up rusting. So just be aware that that will probably happen. Still, they are pretty cheap to replace and a vast improvement over the crappola ones that come with the kettles.

  5. Anisa says:

    Love it! My stupid rack is all rusted and they are horrible anyway. I Love this idea – brilliant!

  6. Mama Turtle says:

    I only water bath can at the moment, and I found that using a big 22 qt seafood/tamale steamer pot works great and is deep enough for quarts. It has a rack a couple inches off the bottom with round holes in it, and I just use a hand jar lifter to get the jars out. I never thought those wire racks looked very sturdy, so I never had one.

  7. Anonymous says:

    Love this! Thank you!

  8. Sherry says:

    Love this idea! Also like the idea of custom sizing. I could make a smaller rack to fit my pasta pot and do small-batch canning!

  9. Saskia says:

    Thanks for explaining! I canned my first ever batch of fruit last week and stared at that rack for a long time wondering how on earth THAT was supposed to work without me landing in burn unit. I decided to use it only to set the jars on and removed them with the jar gripper tool, but like you said, the little jars tipped over anyway. Now I know what to do instead! Thank you, thank you!

  10. Alice says:

    This is exactly what I do too! Except I do use wide-mouth rings, and now I completely want to switch to regular-mouth ones. I attached mine to each other with those green-paper-covered twist ties, which have now mostly disintegrated. I had to rig this up because I don't actually have a canner pot. I was borrowing one for a while, but I almost always do pint or half-pint containers, and I hate having to heat up the huge pot of water for such a small volume.

    This post made my morning, so hard.

  11. Kacee says:

    We have a small wooden platform we made for the bottom of our canner. It's just small pieces of I think 1/2" x1/2" wood in the basket weave pattern nailed together. Works great and we just use the canning tongs to get the jars out of the canner.

  12. Gail says:

    Have you read the Blue Chair Jam book? She actually puts her jars in the oven, rather than stove. I tried it and LOVED the process. I will never go back to a steam bath.

  13. Debbie M. says:

    You hit it on the nose with your assessment of the racks that come with the pots. There are replacement racks that have 3 bottom wires that work great, however, I’m all about DIY. I have found salad spinner baskets in a variety of sizes to fit a number of my pots and they usually only cost about a quarter.

  14. Angela S. says:

    FAbulous idea!!!! I made one this morning as I was just doing a small batch of jam and wanted to use a smaller pot! They are sterilizing on the stove as I type and working like a charm. Thanks for sharing.

  15. Dianne says:

    Nice MacGyver-ing job!

    I’m a beginner beginner, but didn’t start with the requisite canning pot and rack. However, I was concerned about the jars resting on the bottom of the pot I was using. After a few batches I bought a round cake/baking cooling rack to raise the jars off the bottom. The rack fits perfectly, but it is elevated and my pot is relatively short (great for pints without a rack) so I plan to test it out flipped over for reduced height and see if that works better. Make sure you measure the inner diameter of the pot, especially at the bottom before purchasing/repurposing.

  16. Jill Appenzeller says:

    So happy I’m not the only one who hates those things! You know the little jog in the handles that’s supposed to let you hang the handles on the side of the pot, with the jars out of the water? Well, it’s actually there just to tip your jars over and make you crazy trying to get them standing up again. Last week when making strawberry-rhubarb jam I used a wooden spoon, a jar lifter, a silicon mitt (elbow length, great for canning. get two) and a second wooden spoon in my teeth, and I still couldn’t get the damned jars to stand up. Off to look for zip ties…

Trackbacks

  1. [...] Canning rack of any kind (here is a helpful DIY canning rack idea! The idea is just to keep it off the bottom of the pot) [...]

Your participation makes this whole thing work, so join in! Comment policy: Wheaton's Law enforced here.

*